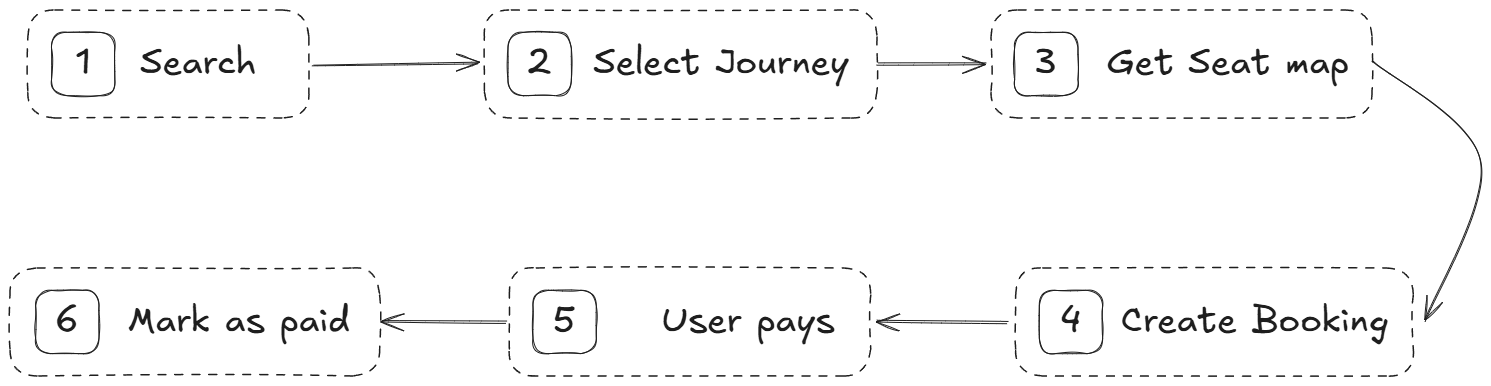
Understanding
The booking flow is a multi-step process that enables users to book a journey.- Search for journeys
- Select a seat
- Create a booking
1. Search for Journeys
First, ensure you have selected the correct cities. You can retrieve the list of cities from the cities endpoint. Next, retrieve the journeys available between the selected cities. You’ll receive a list of journeys, each with details such as inventory, route, departure time, arrival time, price, and other relevant information. Each time you search for journeys, you will receive asearchId that can be used in subsequent steps.
We currently support the following journey inventories:
- Markoub (internal buses)
- CTM
- Ghazala
- Sat
- Supratours
The
searchId serves as a unique identifier for each search. To track a user’s journey, you must store this ID and use it in subsequent steps. One way to achieve this is by saving it in cookies. When the user selects a journey and moves to the next step, you can check if the cookie exists. If it does, retrieve the searchId to access the seat map and create a booking.In addition to the searchId, you must also store the selected journey ID, as it is required in subsequent steps.Note that the search results are valid for approximately 15 minutes. After this period, the search will expire, and the user will need to perform a new search.2. Select a Seat
We have introduced the option to show or hide seat map selection. Before prompting the user to select a seat, check ifshowSeatMap is true in the journey route object. This feature is only available for journeys in the markoub, ghazala, and sat inventories.
If showSeatMap is true, retrieve the seat map for the journey. This endpoint preselects the first available seats based on the initial number of passengers selected during the search, allowing the user to choose their preferred seat.
If showSeatMap is false, call the seat map endpoint, using the preselected seats for the create booking step. Let the user know that “Seat reservation is not available; they are free to choose their seat when they board the bus.” and pass the preselected seats to the create booking step.
For the
ctm inventory, use the update seat endpoint to modify the seat selection. This endpoint can only update seat selection if the CTM basket is active and the seat is not already booked. The selected seats are not required for the next step.For other inventories, ensure the selected seats are passed to the create booking step when showSeatMap is true, no need to pass them if its false.3. Create Booking
The final step is to create the booking. You’ll need to pass in thesearchId, the selected journeyId, the selected seats, and the user’s information (e.g., name, phone, email). Refer to the create booking endpoint for more details.
It is best to create the booking as soon as payment is initiated to reduce the
number of abandoned bookings on the platform.
- If the payment is successful, call the mark booking paid endpoint to mark the booking as paid.
- If the payment fails, call the mark booking cancelled endpoint to cancel the booking.